BUILDING A SKINCARE ROUTINE

BUILDING A SKINCARE ROUTINE

Skincare routine can sound like such a guesswork. There are endless rules and you almost feel like you need to buy 1000 beauty products to get that healthy glowy skin. I feel you. A couple of years back, I felt the same to the point that I used to almost cry (no kidding) but it should not be like that.. Just because other people have a 50 step skincare routine doesn’t mean you need to have it too! Skincare should be a time to provide love to your skin. Anything that feels good to you is your skincare routine! Just however, there are a few things that one should keep in mind to make a BASIC WORKABLE SKINCARE ROUTINE. This piece of reading will provide you with a rough guide.

1) KNOW YOU SKIN TYPE

One should know their skin type. Is your skin dry, oily, sensitive or a combo? Dry skin can be very flaky or peel off from time to time. Redness and irritation are common for dry skin types. Oily skin is as the name suggest quite ‘oily’ or gets greasy as the day goes by. Combination skin is when your skin is oily mainly in the T zone (nose and forehead) and dry of the other parts. Skin type also tells a person a bit about the pore size. Oily skin tends to have larger pores while dry skin has small pore size. Breakouts are a common issue for oily skin type. Knowing your skin type is important in selecting the right products. You don’t want to be buying a cleanser or toner that is made for a different skin type. It just won’t work well for you and you will end up disappointed. You need products that ‘TARGET’ your skin type.

2) UNDERSTAND SKIN CARE ORDER

This is a very important point that can really change the effectiveness of your skincare routine. Always remember the order of applying skincare products. Thin and water based products must always be applied before thicker creamy products. This is because a water based product may not be able to penetrate and absorb into your skin properly if it is applied over a product with thicker molecules. IT WILL BE BLOCKED. This is the order that I follow and it works for me!! I do not use eye creams. I don’t know – just not my thing but if you use under eye creams then they should go on after your serum. I try to only exfoliate once a week and use a face mask on the other days.

Morning Routine

Night Time Routine

3) CLEANSER SELECTION

Cleansers are essential for skincare. In my opinion, they absolutely must be a part of every skincare routine. You must remove all the dirt and crap off your face before you apply any skincare products. Depending on your skin type, select your face cleanser. Foamy and gel cleansers are best suited for oily skin types while milky or creamy formulas work better for dry skin types. Combination skin types can be more flexible. Gel cleansers are a good option for combo skin! Sensitive skin types should look for cleansers that are gentle on the skin.

4) CHOOSE PRODUCTS FOR YOUR SKIN CONDITION/PROBLEMS & DO NOT OVERDO

Try to stick to lesser products. Do not use 50 serums or face oils in your routine. Choose what is best for your skin condition. What are you after? Do you suffer from hyper pigmentation? Looking for brightening? Dull skin? Then look for products that have ingredients that can help with brightening such as VITAMIN C (ascorbic acid or ascorbates). AHAs (exfoliant) also help with brightening and dullness. AHAs examples include glycolic acid and lactic acid. AHAs are great for dry skin. Do you suffer from breakout? Clogged pores? Then look for products such as clay masks or use BHAs (exfoliant) such as salicylic acid. AHAs and BHAs are both chemical exfoliants that do wonders for your skin provided that you use them as per instructions. Do you suffer from dryness/flakiness? Then look for products that have soothing ingredients such as aloe vera etc. Always always buy something for tackling your skin condition. Don’t just buy it because your friend loves it :).

Follow these steps and build a basic skincare routine – You will get there & you got this ;).

BUYING YOUR FIRST INDOOR PLANT(S)

BUYING YOUR FIRST INDOOR PLANT(S)

Buying your first plant or plants can be quite a challenging, stressful and confusing task. Just like animals, plants demand CARE & LOVE as well which makes this task difficult BUT it is not as hard as it seems. When I bought my first plant, I was quite nervous too!!!! I am no expert but this is what I have learnt so far! Hopefully this guide makes this easy for you guys. So let’s get right into it 😉

1. STUDY & RESEARCH

So, don’t just go ahead and buy the plant you want! Do the research work. Different regions of the world favor different plants. There is a reason why cactus plant survives the harsh desert. Ask yourself the basic questions: What plants are best suited for the conditions in my country? What are the plants that do well indoors? Which plants require direct/indirect sunlight? What is the water retention of the plants you like? All these factors affect how well your plant will perform. It is important to assess this right away! Once you have done the research work, you will already have a shorter list of plants to choose from.

2. SURROUNDINGS AND SPACE

It is important to assess your living space. It is always better to decide ‘what spots’ will you pick for your plants. One thing I have learnt is that if you don’t know where you will keep your plants and decide that after you have bought your plant(s), you run into a PROBLEM. This can be reason why your plant will not grow properly. Assess how many plants can come near a window or in the kitchen etc. Is your house/apartment sun facing? Never place two plants too close to each other. Every plant should have enough room to grow. Some of the houses/apartments are not centrally heated or air conditioned and this can cause issues as well. Think about all these factors before you buy a plant. Knowing your house will also help you to pick up the right indoor plants.

3. START EASY

There are some plants that do well with minimal care and have higher adaptability. Go for these plants. Devil’s Ivy is a charm, it is super easy to grow and will not complain even if you leave it alone for weeks but DON’T OVER-WATER IT!! Monstera plant types are pretty adaptable as well and do well. It is better for beginners to opt for such plants. Don’t do too much when you are just learning.

5. RE-POTTING

Make sure that you re-pot your plant as soon as you buy it! This is the process of transferring the plant to your own pot where the plant can be mixed with new potting mix which will give it better nutrition etc. Always place some soil in the pot then place the plant in the pot and slowly more potting mix contents into the pot to cover and pack the roots completely. It is preferable to mix old and new mix together for best results. Also relax the plant roots before you add it back in!

6. CARE & LOVE TIMETABLE

Set a day for watering all your plants. One common issue beginners face is ‘over watering’ and ‘under watering’ their plants. Generally, watering indoor plants once a week in summer and once every 10 days in winter is sufficient. Pick a day to water the plants and stick to it!!!! Give your plant all the love it needs that day. Other than watering, it is important to check your plant properly on this particular DAY. Usually plant leaves turn yellow or brown when they are over watered or under watered (every plant is different). This is the way they talk to us! You may want to skip watering or water extra depending on the color of the leaves. Cut off any dead leaves right away. If possible, also check the roots of your plants. The lighter the roots, the healthier the plant and untangle them very gently to spread them out (they can tangle together very BADLY which hinders growth!).

SPANISH CHICKEN AND QUINOA

SPANISH CHICKEN AND QUINOA

I was inspired by the recipe of Tiffany’s website “Creme De La Crumb” to have my own ‘take’ on this recipe. She uses the ever famous ‘Spanish Rice’ taste to create the yum factor in her recipe. I replaced the rice with quinoa as it provides more protein and is a healthier option. Quinoa is a lovely grain that works well in many recipes. I also included black beans and olives in my recipe – You can add anything you like. Mushrooms other types of beans!

INGREDIENTS

2 cups chicken or beef stock

1 cup quinoa

1-2 tsp hot chilli powder

1 tsp cumin powder

1 tsp oregano

1 tsp paprika powder

3 chicken thigh pieces

1 lemon or lemon juice

1 tsp salt

Handful of black beans

Handful of olives

1-2 tbsp vegetable or olive oil

1 tsp of parsley (for garnishing)

1 tsp chilli flakes

METHOD

1) In a saucepan, boil quinoa till it is just about ready.

2) Combine hot chilli powder, chilli flakes, cumin powder, salt, oregano, paprika powder and italian herbs in a bowl. Use half of the mixture in step 3 leaving the other half of mixture to add to quinoa.

3) In a bowl, apply lemon juice or little oil (I use lemon juice) on chicken pieces and then apply the mix evenly on both sides of the chicken thigh pieces, I make cuts in the chicken pieces to ensure deep marination can take place.

4) Fry the chicken in a little bit of oil till it is light brown and then remove it from the pan.

5) Add and mix chicken/beef stock, quinoa, lemon juice, black beans and olives in a pan properly.

6) Add chicken at the top of the quinoa mixture and then cover the pan.

7) Let the dish cook for half an hour until the liquid is 95% reduced.

8) Garnish with more chilli flakes, lemon slices and parsley.

LUMAE SKIN – MICRODERMABRASION

LUMAE MICRODERMABRASION REJUVENATION KIT: THOUGHTS SO FAR

I bought the Lumae Microdermabrasion Kit around 2-3 weeks ago. I have completed two treatments with this tool and the results have truely amazed me that I was eager to write and upload a review on this tool right away. I will update this post as I complete more treatments with the tool but I have no doubt that my opinion WILL NOT CHANGE! Before I dissect my review, I would like to put it out there that this is truly my experience and opinion – There will be people who will disagree with me and that is totally fine. Our skin is very personal and everyone’s skin reacts to products and tools differently depending on the skin features etc. Microdermabrasion is a mildly invasive face treatment procedure involving vacuum suction (very popular these days) that helps to improves hyper pigmentation, skin tone and texture while handling that pore size. Microdermabrasion removes dead skin cells and performs deep exfoliation for better, soft and healthy looking skin. The tool also rejuvenates and brightens the overall skin tone.

This review will be divided as follows: The recommended steps before using the tool, the frequency of tool use, the tool parts, the procedure required to get maximum results, the aftercare, my thoughts on the product (so far).

The kit packaging

RECOMMENDED STEPS – PRETREATMENT

Before you begin using the tool, it is best to do a deep face cleanse (double cleansing is often helpful). Make sure that your skin is free of any makeup residue and dirt. I personally use Dermalogica’s pre-cleanse and Dermalogica’s active clay cleanser for this step.

After you have finished cleansing you face completely, it is recommended to do face steaming for 10 minutes. You can do this easily using a face steamer tool or by simply boiling water in a large saucepan. This step helps the pores to open up which allows for better exfoliation and removal of blackheads/whiteheads (by softening them). Make sure that you steam your face all over properly for 10 minutes for optimal results.

FYI – Your hair will be full of steam haha but we have to loose something to gain something right?!

THE FREQUENCY OF TOOL USE

The Lumae Microdermabrasion tool must not be used more than once a week. The procedure can be quite a bit for your skin and you must allow your skin to completely heal before you do another treatment. Overuse of the tool may lead to scarring and unsightly skin marks.

TOOL PARTS

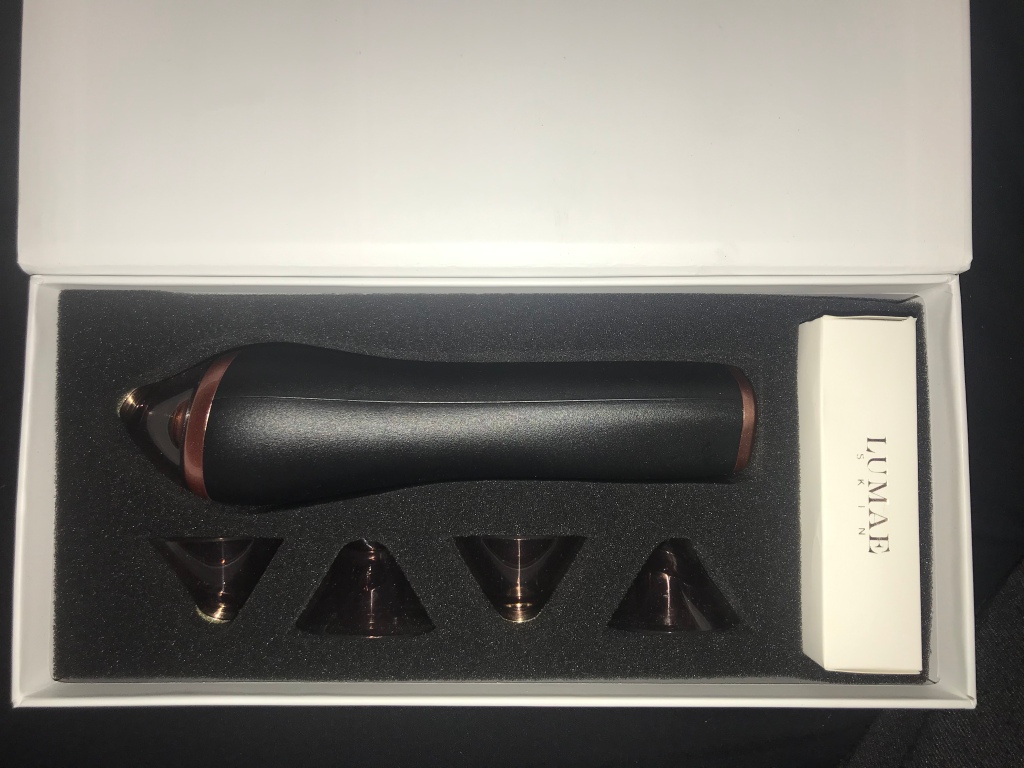
The kit comes with 5 customizable heads (3 micro-crystalline, 1 small and 1 oval), 20 filters, user manual, handset and charging cable. The microcrystalline head is PERFECT for deep exfoliation and getting rid of the dull dead skin. Small head is AWESOME for focus areas specially the nose to target the ugly blackheads and whiteheads (the ones ready for extraction ofcourse!). The oval head (WHICH IS MY FAVOURITE) is good for blood circulation and inducing collagen production – ALL THE HAPPY STUFF! The charging cable can be used to charge the handset – the handset flicks ‘red’ light while charging and turns ‘blue’ when fully charged. Each filter can be used for 4-8 treatments depending on how much you use them. Refilling of these filters is super easy. Just remove the head, pop out the filter and put a new one in.

Left: micro-crystalline, Middle: Oval, Right: Small

THE PROCEDURE

After cleansing and steaming your face, the tool can be used. The tool has four setting levels – low(1), medium (2), high (3), super high (4). For most people 1 or 2 level setting is enough as 3 and 4 can be super harsh. For me, level 1 is super good and enough to see results. Level 3 and 4 can be used mostly on other body parts :).

After you have chosen a desired level, slowly work the tool from the bottom to the top of your face making sure you do not go over an area more than once to ensure you do not end up giving yourself A SCAR!! Make sure that you tighten your face using your fingers for better results. Work on each area inwards to outwards. Be super careful around the nose and avoid the eye area ALWAYS. Also make sure that your strokes are super gentle as the handset can be super harsh if you go over your skin with a lot of force. As you finish the treatment over an area, the area will become temporarily red (THIS IS COMPLETELY OKAY AS THE VACUUM SUCTION INCREASES BLOOD FLOW TO YOUR SKIN – MORE BLOOD FLOW, REDDER THE SKIN). The redness should go down after 1-2 days. If any area acts up or reacts badly, LEAVE IT ALONE RIGHT AWAY!

The procedure should not last longer than 5-10 minutes. Once the procedure is completed, you MUST MUST wash your face with cold water to avoid clogging of you pores.

AFTER CARE – POST TREATMENT

Your skin will be a little sensitive post treatment. Make sure that you pamper your skin with lots of aloe vera and soothing products. As mentioned the sensitivity and redness must go down in 1-2 days. For both my treatments, the redness visibly reduced on the second day. AVOID THE USE OF GLYCOLIC ACID AND RETIONAL FOR 2 DAYS.

MY THOUGHTS

If you already didn’t guess, I LOVE THIS PRODUCT!!!!!!! On the third day after the treatment, my skin was glowing and felt like baby skin. The skin appeared to be a lot fresher, tighter and healthier looking. I was completely obsessed with the results that I decided to write my review a little earlier – I originally planned to write after 3-4 treatments. Also, I’m enjoying the fact that I do not have to spend thousands of dollars in clinics to get my microdermabrasion process done. I recommend everyone (both women and men) to invest in this tool and use it religiously :). You will not be disappointed. Just do remember that the skin will be sensitive and maybe a bit flaky for 1-2 days but once it heals – WHAT YOU SEE IS AMAZING! Personally, I use the small head on my nose, oval head on my cheeks and the micro-crystalline head on my chin and forehead.

The full kit

If you have any further questions about this product, do not hesitate to reach out to me via my Instagram DMs ;).

Design a site like this with WordPress.com
Get started